
CarbonMiata Spyder Grille
2016-2024
USA Supply!
ETA For Next Batch is May
PART NUMBER: 61-2195
READ REVIEWS (12) | WRITE A REVIEW
Prepay For Next Delivery
DESCRIPTION
Great Looks and Improved Function!
This beautiful ABS plastic injected front grille was originally inspired by the grille of Mazda's show car 'Spyder' project. CarbonMiata turned this show car dream into reality.
Perfect fitment on the OEM bumper tabs. This grille replaces the OEM grille and improves the airflow going to the radiator and engine bay. Featured on our own Turbo and Supercharged NDs. All normally aspirated ND Miatas built for track use in the Global Cup series are now built with these same grilles for better cooling in hard race use! They look awesome and they work!
Specifications:
ABS material
Glossy black finish
Strong and damage resistant
Reuses OEM tabs. Can be installed with no drilling, no cutting, no modification, though see our ND thread notes.
Installation guide available at: https://drive.google.com/open?id=1NQa_osBXRlxAZFJXLP7ZflGwJrj0yIQ7
As used in our TURBO ND, more grille open area compared to the stock grille gets us more flow for better cooling, and yet better protection on track from rocks damaging the intercooler.
Install Video by real world customer.
Install video by CarbonMiata:
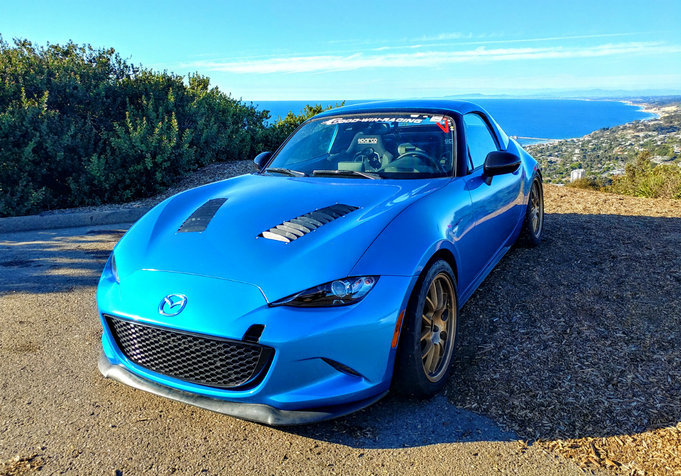
Picture Below Courtesy Customer Derek Howard. Also featuring our RF Springs and Konig Hypergram 17x8 Wheels:
CUSTOMERS WHO BOUGHT THIS ITEM ALSO BOUGHT
TEAM RECOMMENDATIONS
Customer Reviews
CarbonMiata Spyder Grille
it's a nice looking piece- just be forewarned the grille sticks out PAST the bumper so this is your new bumper- you hit something, tap something- you will break it.
First adult car purchase and mod. Fairly user friendly install. Between the instructions and DriveMx5 YouTube video, managed to complete in 4 hours without a jack and stands. Anyone mechanically competent could do it much quicker and maybe under an hour. Taking the wheel shields off was a real PITA. Removing the DRL cable connectors was probably the hardest part through the wheel well. I did that first before removing bumper. The two harness unclip fine, itââ¬â¢s the cable management tabs that were difficult to suppress. Maybe I should have just cut them off and installed zip ties. Not sure.
Original grille popped out fairly easy. Did not cut off the original upper bumper plastic support layer. Just removed the whole thing. The carbon grille fitment seems okay. I couldn't get the bottom to lock in well but after trying to tap it off, the top clips seemed looser, overall appeared to be secure to light pressure. Took the opportunity to install the roadster license plate holder.
This grille is exposed less than a 1/4" inch passed bumper. Can barely see it. Did not add any lights, horns or drill out the filled hexagons, not experienced enough to do that and make it look clean. Overall, looks really sharp and happy with the final results. Wish I didn't misplace that one 8mm screw, dang it!
Test driven after on a windy day at 80mph and stayed in place just fine!
Fitment is good and the part is nice and solid feeling. Clips right into the factory clips easily. The top edge protrudes about a half inch past the bumper on mine, which isn't an issue to me. But I did notice at last year's MATG that among the NDs using this grille, some stuck out up to an inch up top while others were either flush or slightly recessed. So, it seems there is some possibility of variation, perhaps on earlier built grilles?
INSTALLATION NOTES:
You need to remove your front wheels, lower splash guards, and an extra clip on the upper splash guards to get the bumper completely loose. You do NOT need to remove the under tray.
The factory grille extends quite a bit up under the top of the bumper. If you fully remove and replace it, the areas around your Mazda badge can easily be pressed inward as there is no longer support in the "nose" of the car. If that bothers you, you can cut the top part of the OEM grille off and reinstall it (the part that uses silver screws to attach to the top of the inside of the bumper).
I vinyl wrapped my crash beam since you can see its paint very clearly through the new grille. I would guess this had something to do with why the top of the OEM grille is the glossy black solid insert (factory grille is two pieces). If your car is dark gray or black you don't need to worry about this.
Fast shipping and product arrived in excellent condition. Quick response with any questions or concerns.
Bought this to aide in the airflow to my intercooler. It's beautiful, installation was easy and it clipped into place. I removed the entire old grill and just snapped this into the existing clips. Not cutting was required for me and it looks amazing. Like everything if gotten from Goodwin, tracking number comes back same day as order.
Product is as described although it is different from picture shown. In my case the top portion of the grill protrudes from the bumper as opposed to my friends car sits flush. I do not know if this is for an updated design. Fitment is good but could be better (again maybe this is just for me) if you really get down and look at it you can see a slight stretch in the bumper almost forced. Installation was pretty straight forward. I opted to remove the whole grill instead of doing the optional top part cut. Really changes the look of the car. I installed this a few days before my trip to Miata Reunion and I noticed that debris and bugs get lodged easily on the edges. Great product, great quality. I am very pleased.
Received quickly. Roughly 45-minute install.
The good: love it, definitely opens the front of the car to allow more airflow. Looks great (except that the upper center of grill protrudes past upper bumper surround).
The bad: requires cutting/gutting some of the factory grill support structure resulting in less support on the top front of the bumper cap, not sure how this will affect the bumper cap over time. As mentioned above, this doesn't fit the same way as the factor section does and protrudes past out past bumper cover on top center. Probably less noticeable on darker colors, but definitely noticeable with the RO on the 30AE. Also, there are 10 sections of the honeycomb grill that are filled in for securing license plates. Will have to dremel these out if you want the right look.
Recommended w/ some reservations noted above.
PS. Highly recommend doing any other work on the front end of call (e.g. radiator, sways, upgraded horns, etc.) at same time, as this seemed way more involved than NA - NC bumper removal.
Looks awesome. I wish I could upload a pic to show it off here.
The install was pretty easy. I'd say a 5/10 for difficulty. Watch the youtube Vid on the description page. Just a few tips from my experience after watching and doing the install.
1. You do not have to remove the grey fabric bottom covering. You can...but you really don't need too remove that piece.
2. The two screws on each wheel arch (the ones under the fender liner towards the top of the fender underneath the headlight corner) can be removed with the wheels on, but you will need a swivel socket. I used ramps so I couldn't turn the wheels and it's a tight area w/o using the swivel socket. Hindsight, I would put my front up on jacks and simply remove the front wheels. Then it would be simple (but adds time and effort).
3. When putting the bumper back on AND if you didn't remove the grey fabric bottom cover make sure you have the bumper and grey cover correctly orientated. I slapped on both corners and started to put the push pins and screws back on the bumper and I didn't realize the grey piece was not seated properly with the bumper and by this time I didn't have any give with the bumper. That was me rushing instead of ensuring the pieces were properly aligned before putting in the fasteners and screws.
I took this opportunity to swap out the stock horns with Hella SuperTone horns. These horns in different colors can be ordered via subbiespeed. I used them when I had my WRX and they have pretty much any color you want. There are attachment holes already there to place the two horns behind the grill. You can use the stock wiring. You will have to ground each horn to the metal frame and the power leads will be re-used. All you need to do is add about 2 feet for the power line on the horn low behind the bumper. With the stock grill you can only see one horn...but there are two and you will use both power leads for the Hellas. Love them. I got the red brackets and with the sun shining in the front they look great behind the grill. They some what disappear when the sun isn't hitting them. Scare the sh1t out of the wife when she asked what I was doing and I asked her to stand in front of the car. I was advised not to do that again.
As always...Thank you Brian. Fast shipment and the "Fun Inside" sticker is great.
I bought my MX-5 used. Unfortunately, license plate holes were already drilled in (minor but annoying). Then I found out about this grill. The sale price was already enticing. But what convinced me to pull the trigger was the radiator fin protection. I've owned two Rx-8s but I have never bought screen protectors for my oil coolers. In hindsight I wish I did. I have the opportunity to make things right with my MX-5.
A very lax Saturday install and the grill is on after a couple of hours. After combining notes from the installation pdfs on this site, it was fairly easy. As for the DRL wire harnesses issue, I unscrewed one of the DRL units from the bumper cover and inspected the back of the wire fasteners. I saw where I had to pinch to remove the wire fasteners and applied that knowledge to the other DRL, without unscrewing it from the bumper cover. And contrary to the video here, I did not have to cut anything. Fitment is so excellent, you'd think this grill was OEM from a future model.
My car is Jet Black Mica and the grill looks good! I was unaware how far the top "lip" of the grill projects beyond the bumper (about 0.35"). I'm sure this will be well complemented with a front bumper lip or splitter. It opens up a lot of space that was once hidden behind the OEM grill.
Are you tired of your ND looking like it's wearing a mouth guard? Then this is the grille for you. The quality and finish on this grille is excellent. The install is fairly straightforward and makes gives it a much more upmarket look.
This grill looks great once installed. It did not take long to install, but the instructions (link to another site from Goodwin racing) do not explain a lot of what needs to be done and then have you remove the entire DRL assemblies, all that needs to be done are remove the wiring harness tabs. Luckily I'm in the automotive field and take cars apart all the time, so it was pretty easy for me. This grill makes the Miata look so much better. I love it, just wish there were better instructions, to make it easy for everyone. Also if you have the aero kit on your vehicle there will be extra screws to take out that aren't mentioned anywhere in the instructions. I installed my own aero kit, so I knew about these.
Thanks for the great looking grill!!!
Love the look overall, but looking straight on the color of the metal underneath shows through. I guess I could have painted it black before remounting the nose, but now that it's on I really don't want to go through the process of removing it again. The install directions from Carbon Miata are way over simplified, they show only a handful of fasteners when in reality there are 10 plastic clips and 12 screws in some difficult to reach places. My car is lowered so I was not able to put the front end on my ramps as I had first planned, but I recommend getting the front at least a foot or more up so you can get at all the fasteners on the underbody. Be patient, good luck.
Want to Review This Product?
(You must be logged in as a Good-Win-Racing Member. Join Now. It's Free!)