
RoadsterSport Sway Bar Combo for ND Miata and Fiat 124
2016-2026
Third Generation Kit!
PART NUMBER: 61-2123D
DESCRIPTION
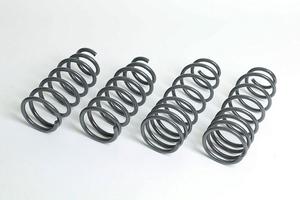
The BEST DEAL in Sways. Our RoadsterSport Sway Bar Kit is for the daily driver at a price that no other sway combo can match with these features. Pairs great with our Progress or RoadsterSport springs for the road or light track duty.
Included In Each Kit:
*Front Sway Bar: 27mm OD / 3.6mm wall, 3 adjustments
*Rear Sway Bar: 16mm solid, 3 adjustments
*Bushings and Brackets
*Bushing lube
BRIAN's APPLICATION NOTES: Our Progress Bars are the premium choice in our lineup, top of the food chain. For those on a budget these RoadsterSport Sways are a high value and balanced choice for dedicated daily drivers. This budget choice has three adjustment holes front and rear for LOTS of adjustment potential with bar rates that make a big difference over stock without going full race stiff. All hardware included with grease, making a complete setup at a great price! A great choice for casual daily drivers seeking to make the car more flat and fun in the turns. If you even dream of track or autocross days in your future, please spend a bit more for our Progress Sways. For starting settings most folks should be MIDDLE hole at each side of the front bar and SOFTEST position for rear (holes nearest bar ends of rear bar).
Endlinks? Stock links are fine at stock height. When you change to a stiffer sway bar AND you lower your MX5 you likely want adjustable endlinks for best geometry (bar ends level as possible). Thus, those lowering the Miata see RoadsterSport Endlinks, item 61-1795ND.
See our forum for installation methods/tips for ND sway bars.
Second Generation kit included a number of small tweaks to our original design to further improve geometry and installation ease.
Building on this, the new THIRD Generation kit features deep grooves molded in the inside of the sway bar bushings to aid in grease retention:
CUSTOMERS WHO BOUGHT THIS ITEM ALSO BOUGHT


RoadsterSport ND SuperStreet Single Tip Muffler
MIATA MX5-ND 2016-2026
Stainless Steel PREMIUM ADJUSTABLE MX5 Miata Exhaust
Helmholtz Chamber Design Means Max Fun.
Just 14 pounds!
Gains 8hp in independent magazine tests!

RoadsterSport ND Race Muffler
MIATA MX5-ND 2016-2026
Just 12 pounds!
A Revolutionary Helmholtz Chamber Race Muffler for Max Fun!
Progress Technology Springs for ND RF
MIATA MX5-ND 2016-2026 · RF
Good-Win Racing Exclusive....Get RF Heights Right!

TEAM RECOMMENDATIONS
Customer Reviews
RoadsterSport Sway Bar Combo for ND Miata and Fiat 124
I just bought a '23 Miata Club, all stock. I had a 2002 Miata years ago and upgraded its suspension right away, so I knew I wanted to do the same with this one.
These RoadsterSport sway bars were a HUGE upgrade! They greatly reduced the body roll that these cars have in stock form. They're an excellent value, that you can really feel.
Installing the front bar is a well documented procedure that seems overwhelming until you're done. Then you'll think- that wasn't so bad! The rear is super simple. If you're on the fence about buying these, just do it! You'll be impressed.
Sway bars are a huge improvement and a must for any ND to reduce body roll. Quality is top notch and red is a really nice underbody pop, I am not really sure what the difference is with other sway kits that are double or triple the price? I installed aftermarket end links as well to help with articulation as I read some forums that the stock endlinks can creek.
The rear sway bar is very easy to install maybe 30 minutes, however the front is very involved. There are lots of videos online for other sway brands but even they have fitment issues and say it takes some finesse and exploring to find what works best. That being said it took my local shop almost 6 hours to install the front sway properly and I ended up needing an alignment afterwards with all the underbody that needed to be removed. Luckily I knew the shop owner because that would have been one hefty bill to install this kit. It would be really nice to have proper instructions or an install video provided by GWR? Other than that super happy with my purchase thank you GWR!
I ran this kit for about a year. Big improvement in body roll and made the car feel really good with just these and lowering springs. I'm still running the rear but I ran into fitment issue with the front when I installed the HKS supercharger. The HKS kit requires the additional pulley on the crank which hit this particular sway bar (only an issue for the HKS kit).
Rear is a 10 minute install. Front is a 2 hour install... it's not a hard install, there's just a lot you have to remove to get the old bar wiggled out and new bar guided in.
I bought a sport because I got a great deal (new).
I only "street" my ND but I've added upgrades:
Wheels (17") tires, Feal coilovers and an LSD.
I noticed that when I took the entrance to the highway, the car really LEANED.
My son suggested swaybars. I bought links for the front; Brian said that the stock rear links are fine for the street, so that's what I did.
Some people claim that swaybars do nothing for street driving. They are clearly wrong.
These provide a perfect low rumble for my ears. As suggested, I tried one baffle only in my SSST tips, but preferred the sound with both. It's enough to know it's not stock but not loud enough to be obnoxious.
These sways keep my street car fun and level in the corners without sacrificing the advantages of an independent suspension. My OEM sway weights front/rear were 4.6# and 2.8#. These are 7# and 5#. I used the middle setting for the front and soft setting (outer hole) for the rear. In this configuration, I have just a little oversteer. I may try moving both up to a stiffer setting after a while, but this seems to be a good combination.
If you are reading this, then you too have decided that you'll no longer tolerate the excessive body roll of stock sway bars! LOL.
Dollar-for-dollar, this is the BEST uprade you can do PERIOD. I've researched to near exhaustion on all the after market sway bars and concluded Good-Win has the best overall value with the close second being Flyin' Miata.
I do all my own maintenance so I'm somewhat mechanically incline but I was still little intimidated based on all the reviews I've read. So I gave myself 8 hours to complete the install but I got it done in less than 4 hours on jack stands by myself. A friend offered to help but this is one man job. I think having an extra person working on it would made it more cumbersome.
I've watched several install videos on YouTube but by far, Flyin' Miata has the best instructions. After watching it several times, I felt comfortable.
For the most part, the install went without any issues. There are 2 things I would highly suggest that'll make the overall process much easier: 1) When removing the radiator hose nut (the one in front of sway bar), loosen the end links and brackets first so that you can move the sway bar around to give yourself more room to access the nut. I don't know why they didn't do it this way but it much easier instead of removing the belly pan. 2) When removing the top nut on the sway bar bracket, don't use a box wrench! There's very little clearance between the top bolt and subframe so your wrench will get stuck. I almost couldn't get it out and this took me over half an hour of sweating and swearing! LOL
Other than that, follow everything else as is and you'll be just fine. Easy-peasy.
The final result... now it feels like a proper sports car! This is how it should have been came from the factory. I didn't like the suggested middle setting so I went with full stiff at front and full soft at the rear. It feels very dialed in.
My advise, don't hesitate on this and just do it! You'll be so very happy you did.
Arrived without any problems. Installed it on a lift with 2 club members. Total install front and rear was done in 2 hours, 35 minutes. Only difficulty was removal of the old front stabilizer bar. Several You Tube videos were a big help. I used Super Lube synthetic grease rather than the supplied grease, based on the recommendations of others.
The vehicle now corners without any noticeable body lean. No squeaks or rattles. I am very satisfied with the purchase.
Want to Review This Product?
(You must be logged in as a Good-Win-Racing Member. Join Now. It's Free!)