

RoadsterSport MAX Power 1.8 Inch NC Stainless Steel Header
2006-2015
PART NUMBER: 61-1979
DESCRIPTION
Our famous RoadsterSport MAX Power Header with MONSTER 1.875 inch primaries has become the standard for big power NC builds. Particularly helpful for those with superchargers and 2.5 liter conversions, but testing has shown it is perfect for 2.0L engines too!
2022 UPDATES: Generation 2 of this header improves even further on the best header on the market for the NC:
- Now beautifully TIG welded for an even cleaner finish
- Now comes with a donut gasket for the connection to the midpipe at no extra cost!
- Improved clearance to the passenger side engine mount bracket - Now even compatible with our engine drop brackets that lower the motor a half inch!
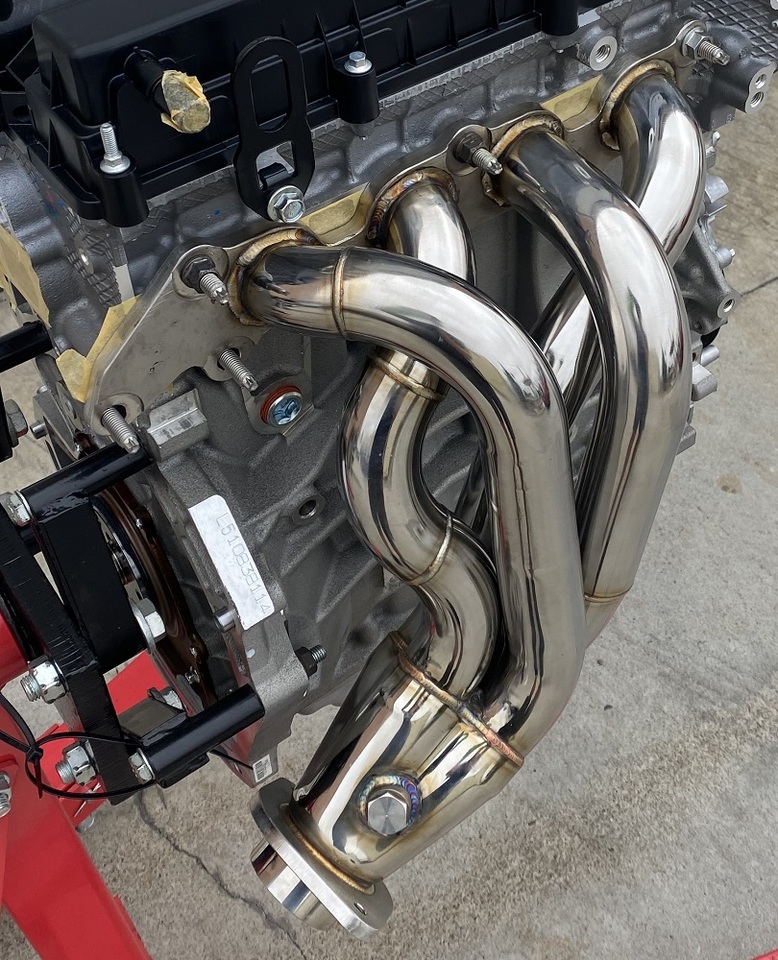
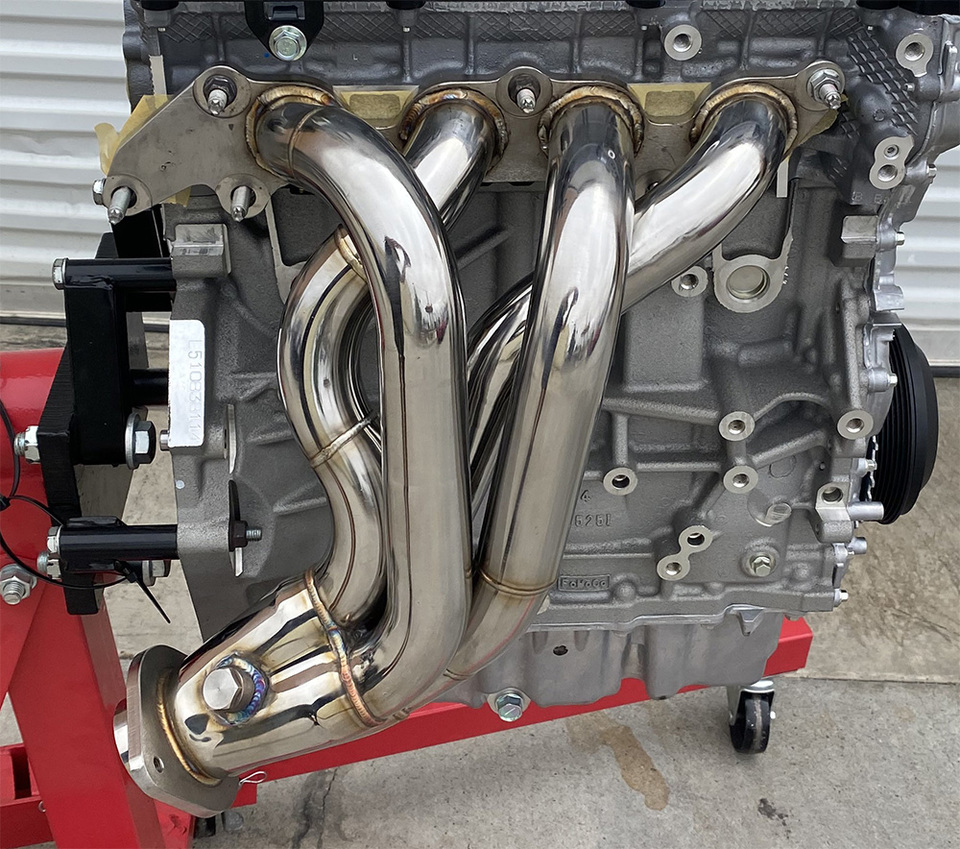
Look at those smooth curves! Notice you don't see 6 welded sections for each primary like so many lesser headers that are made from cut pieces of standard radius pipe and straights. Instead, where possible ultra SMOOTH all mandrel bent tube is used here to keep flow as clean as possible. Sexy all T304 polished stainless steel is formed into massive 1.8 inch primaries for max power...with a lifetime warranty!
We put incredible effort into making the exit at the collector as smooth and perfect as we can get it because this collection point is the KEY to good header flow and we had to make sure this was done as perfect as possible. Note we use the factory collector gasket....so our fit is as factory-like as possible.
Our collector outlet is 2.5 inches. For best high rpm performance customers should match our header with our midpipe and exhaust so they are running 2.5 inches of flow all the way...but our header will bolt in place of the factory header and connect perfectly to the factory midpipe.
GASKETS:
Header comes with new "donut" gasket for the header to midpipe connection. Does NOT come with a gasket for header to engine connection - you reuse your factory gasket there - that gasket is a metal gasket usually good for the lifetime of the car unless you damage yours.
OXYGEN SENSORS:
Several options on what to do with the O2 sensors with our header. Read below for options A, B and C. Optional oxygen sensor wire extension cables are available as an add-on option with this header. Adding ONE wire extension gets you one long wire extension to move the secondary oxygen sensor to the midpipe as described in option B below. Adding TWO wire extensions gets you one long and one short wire extension for moving both primary and secondary oxygen sensors down to the midpipe as described in option A below.
A) Buy our midpipe and our two wiring extensions available here for simple plug and play install. Our midpipes are designed to take both O2 sensors, and includes two O2 sensor connections for that - one before the midpipe's converter and one after the midpipe's converter to help avoid a code. Buy BOTH of our extensions for that option.
B) Second choice and most common choice is first sensor in the header and second sensor in our midpipe after the converter, which will also avoid a code. For install in the midpipe of both sensors you need both O2 extension cords, but if you put the first sensor in the header you only need an extension for the second sensor. The first sensor will reach header connection but you may have to follow the wires back to the harness and use a razor blade to clear some sheath which has them gathered shorter than they actually are.
C) Third choice is to put BOTH sensors in the header, which will cause a code unless your tuner turns off the code caused by having the second sensor in the header. You don't need any wiring extensions for that option (sensors will reach header connection but you may have to follow their wires back to the harness and use a razor blade to clear some sheath which has them gathered shorter than they actually are).
OXYGEN SENSOR BUNGS:
There are TWO oxygen sensor bungs provided by the outlet flange on this header. The header ships with plugs loosely pre-installed in both bungs. Remove a plug to install an o2 sensor where you need it according to the sensor configuration you're running on your particular car (various options A/B/C described above), and where you are not installing a sensor be sure to TIGHTEN the plug there before install.
CARB NOTICE: Installing this header in the 2006 through 2015 MX5 Miata means removing the first catalytic converter which means this header will NEVER be a California street legal header, never be CARB approved (and therefore legal in California for off road use only). Note that there are states in addition to California that now follow the California model and require CARB compliance, please check the rules of your state before ordering, in some states this setup is legal only for race cars and may never be used on public highway. Sorry, we will not ship these to residents of California.
BRIAN'S APPLICATION NOTES: This is THE header for peak power on the NC with 2.0 and supercharger or 2.5 liter conversion. For a long time we suspected it was a bit big for normal street driven 2.0 liter motors but customer dyno work has more recently shown that it beats our smaller 1.6 inch primary header at all points of the curve.
LEFT HAND DRIVE ONLY. This big header is intended for USA/Canada version cars that are left hand drive. Does not fit on RHD cars which have less clearance due to the steering rack being on the exhaust side. For RHD cars, look to our header with 1.6" primaries that does clear the RHD steering rack.
The first converter is also a pretty good resonator so understand that installation of any header will raise the exhaust sound level a good 20%. Therefore, we strongly recommend the RoadsterSport Q muffler with any header change because it was designed to handle the sound level of the header, and our RoadsterSport Helmholtz midpipe tunes the final sound result for drone free fun.
FITMENT NOTES:
YES this header fits with the automatic transmission with a bit of grinding. There is a minor clearance issue between the edge of the header's bottom flange and the auto transmission. Some grinding needs to be done to knock the corner of the flange down a hair and then everything will fit.
INSTRUCTIONS: Read full installation hints and notes in our forum Installation Instruction Section! ---
Dyno shows improvement in power on our supercharged 2007 2.0 liter as compared with 1.6 inch version of same header. This was comparison purely on flow, no changes to tune. With greater flow even more timing could be added to make this difference MUCH greater.
Customer video below using our full exhaust combo: this Max Power 1.8" Header, Helmholtz Chamber Midpipe, and our Super Q Muffler:
CUSTOMERS WHO BOUGHT THIS ITEM ALSO BOUGHT


RoadsterSport HELMHOLTZ MX5 Miata Midpipe with Converter
MIATA MX5-NC 2006-2015
Unique Helmholtz Resonator Makes ANY Muffler Sound Better

RoadsterSport "SUPER-Q" Stainless Steel PREMIUM ADJUSTABLE Sound MX5 Miata Exhaust
MIATA MX5-NC 2006-2015
Our Best Selling NC MX5 Miata Muffler!

RoadsterSport HighFlow Stainless MX5 Miata Midpipe with HighFlow Converter
MIATA MX5-NC 2006-2015
Full 2.5 inches and 5" cat for Max Performance!
ETA for next batch is 4/15


TEAM RECOMMENDATIONS
Customer Reviews
RoadsterSport MAX Power 1.8 Inch NC Stainless Steel Header
There was nothing wrong with my 58,000 mile 2.0L engine. I just wanted a 2.5L. I contacted Xero-Limit and had a new one sourced. While it was on the floor, I bought BC Stage 2 cams, GWR 1.8" header, GWR midpipe, and kept my Borla muffler. He installed everything and slipped it in a a single unit. My engine dynoed at 189hp. You can feel the torque now when you drive aggressively. The sound is great. It isn't loud. At least, I don't think so. It does have a meaty growl that makes it sound 2 cylinders larger.
A dramatic improvement. I already have the Kraftwerks supercharger on the agenda for a July install....
It may be my imagination, but I swear you can feel the engine say "thank you" for helping it to breathe so much better! Added this after the Helmholz midpipe and Super-Q muffler and is (relatively) quiet until 2500-3000, then it sounds like a proper beast.
I totally agree with several other reviews to remove the battery, (I'll add right front tire, and that small plastic shield in the wheel well), and alternator, or at least tilt it forward. Also, get both oxygen sensor extensions - definitely worth it as you have to cut back the wire wrap half way up the alternator as previously pointed out. Disconnect the coolant hose going into the firewall if you have to. Make it as accessible as possible because there isn't much room to work.
The pipes are close to the plastic duct cover on the back of the alternator, but there's still an (1/4"-ish) air gap which is the best thing to stop the transfer of heat. I am trying the blanket but it contacts the pipe and the cover; had to tilt the alternator to get the blanket in the gap which is not ideal. Maybe just my car though.
All in all, a great upgrade which I am incredibly happy with!
First off - this is worth the cost and effort for sure.
A few words of advise - First - follow the instructions on the Good-win forum - do not trust YouTube installs that say you can avoid rocking the alternator forward - that is a waste of time. Unless you take off all of the ridiculous amounts of inaccessible heat shield bolts on the factory manifold, it will not fit out with the alternator in place. Rocking the alternator forward is 2 bolts, it's not a big deal.
Second - take out the battery, give yourself more room to work.
Third - if you live in a rust state, PB blaster is your friend. As are extra long box end wrenches. I got stuck on a simple heat shield bolt for about 2 hours because there is damn near zero room to work on the back and under the factory manifold.
I also had a pretty bad exhaust leak where the header meets the midpipe - The guys at Good-Win advised me to put a washer between the spring and nut on the connection hardware and that solved it.
Now the good stuff - the sound and tone is vastly improved, especially at high RPM's. I did not notice a increase in volume (factory midpipe & Super Q). But, I was happily surprised to hear the drone on decel is almost completely gone now. Not sure if that was caused by my massively failed first cat though so take that with a grain of salt.
I do feel quite an increase in torque in all gears and the engine overall feels like it pulls harder everywhere - but again, that could have been a result of a first cat that was in in several pieces and lodged in the midpipe.
The install was much more involved than I was expecting - I worked on it for 1-3 hours a day and took my time, about a week total. If I had read the instructions I think I would have shaved off 2-3 hours.
-RoadsterSport MAX Power 1.8 Inch NC Stainless Steel Header
2006-2015
-RoadsterSport HELMHOLTZ MX5 Miata Midpipe with Converter
2006-2015 (5 inch)
-MX5 Header Heatshield Blanket
2006-2015
-RoadsterSport II Stainless Steel Duals Exhaust
The above is my combo and holly friggin sh_t balls I love this sound! It is the perfect amount of growl for me with no drone. What I love most is you can keep it tame pulling through your neighborhood at 6am so your neighbors don't hate you. Then, when you get out of the quiet zone, it is a great sound up to about 3500 RPMs and then after 4000 RPMs your ears are in pure ecstasy. Like, the kind of ecstasy that brings a tear to your eyes because your ears just experienced exactly what they were looking for their whole lives. The kind of experience that forces you to turn your iPhone on, put it in selfie video mode, hit record, and rev through the first 3 gears to redline, then text all your car friends the sound while they see you in the background silently expressing your best "holy crap, do you fricken hear that" look. The kind of experience that forces you while driving under a bridge or tunnel to shift to neutral, and rev the living crap out of it while unintentionally scaring the hell out of those sleeping on the sidewalk. The kind of experience that leaves you actually hoping to get the next red light so you can rev out the first 3-4 gears again. The kind of experience that leaves you giggling out loud the weirdest most high pitch sound you've heard yourself do as a 48 year old man and you're not embarrassed at all for doing it.
So yeah, I'm a big fan.
Unsurprisingly, very happy with the product, just look at this compared to stock unit, you can see it is going to flow better. Could feel difference even prior to tune. Installed with hemholtz catted midpipe and race single. Ear bleeding loud? Yeah kinda, not wife approved. Honestly, not even husband (me) approved. Have super q on the way. Ultimately happy with the mods though. Keeping the race single for my midlife crisis in about 2 years or so.
About the installââ¬Â¦ I think even regardless of your mechanical skill level, this is a bit of a frustrating job. Not that most can not do it, but I think just about everyone will use some real choice language while gettin ââ¬Ëer done. It is just a tight space to work. Definitely give yourself time, I had a time crunch and it just made the experience so much worse. A few things to make it a bit more stream lined: Tilt alternator forward, for sure. Get both the short and long o2 sensor extensions, this way you wonââ¬â¢t have to cut up in the harness (you really gotta cut up high, trust, $50 bucks to avoid this headache is worth it). I know they say you donââ¬â¢t need it, and you probably donââ¬â¢t, but youââ¬â¢ll most likely want it, and I couldnââ¬â¢t encourage you more to get the short in addition to the long. Make sure you have a good mix of wobbles, extensions, and ratchet wrenches to ensure you have access to everything youââ¬â¢ll need to tighten down. Lastly, I didnââ¬â¢t realize this header does not fit with the stock heat shield, so get the TDR heat shield cover sold here as well. Itââ¬â¢s not terribly difficult to install after the fact, but it would have been a little easier to have installed it at the same time as the header itself. Hope this helps!
I purchased this header as well as the GWR catted non-helmholtz midpipe together for Black Friday.
I am utterly incompetent with tools, so I had my diesel mechanic buddy do the install for me. I've seen a lot of people say to remove or tilt the alternator in order to remove the old header and install the new. Buddy thought he'd take a swing at it without doing that, and discovered that an unbolted header neatly locks the alternator in place and hides the bolts from reach. Good job. It took several hours of fiddling and jiggling and cursing to get the old header free, and then an equal amount of time in reverse to get the new header in place. This isn't really the venue for details, but suffice it to say that if I had attempted it myself, I'd have the stock header still hanging loosely in the engine bay with the head spitting fire about at random. If you're not quite experienced and/or talented, you'll want to find someone who knows what they're doing. If you live in a rust-prone area (I don't), then you'll want the job done by someone who you don't mind never speaking to you again. Or, like, an exhaust shop.
The midpipe was much easier, although bolting that to the stock muffler required reusing some hardware that didn't want to be reused. I also purchased both O2 sensor extensions. The short one was just barely long enough; the long one was comedically too long, like, drag-on-the-pavement long. Good Lord. But that's what zip ties are for. Also I must say, I repeatedly heard, "Wow, this kit is REALLY high quality" spoken from beneath my car during install. Aside from the fact that Miatas are small (and the goofy O2 extension, which I assume is that way to support other configurations), the build quality and fitment were beyond reproach.
First impressions were honestly underwhelming. With the stock muffler retained, the sound difference initially was very subtle indeed. There might have been a slight difference in power, but it would take instrumented testing to say for sure. However, I have heard many times that exhaust takes a while to settle in, and indeed, within the first couple hundred miles, the car sounds significantly more angry than stock, at least inside.
About a week after installing the exhaust, I got an Ecutek tune from Fab9 to go with the new exhaust. I don't know what a tune would have done with the stock exhaust, but with this setup, there has been a noticeable increase in power. It's still not a Mustang hunter, obviously, but there's something going on. But more importantly, this exhaust is MUCH lighter than stock, and this will support any future power mods I choose to make, potentially including a supercharger.
TL;DR - Install is hard, get someone who knows what they're doing. If you're just looking for sound, just buy a muffler instead. If you're looking to support future power mods and want parts that are made well and work well, this header is excellent.
One of the first things I changed on my newly acquired NC1 was the exhaust system. This header, coupled with the Hemholtz Mid-pipe, and SuperQ muffler is a winning combination.
Sounds great without being obnoxious or disturbing (neighbor relations are undamaged), while stepping up power. Highly recommend this combo!
This thing is gorgeous! Amazing welds, solid build! This was my last step of the complete exhaust. I now have this, the mid-pipe, and the Super-Q exhaust. I must say prior to updating my tune with Mike @ Xero things were pretty good. Nice sound, no drone. But once you have some milage on this and the corrected tune for the flow this offers, this totally wakes up the car. It's a beast now. Running like a champ. I was skeptical about the tone changing over time, but I'll be the first to say, this setup has mellowed out nicely. What a great-sounding setup. Pulls like a train. Yeah, hop on this.......
Really great piece. I have the Roadstersport Midpipe and Race muffler, so I was going for a very loud result...and I got it. Sounds amazing and really does up the torque above 4500, which is how I drive normally on the street as well as the track. As the other reviewer said, I absolutely HAD to shift my alternator forward and temporarily disconnect the coolant line above the header for installation. Not a big deal, the instructions tell you how. BUT in my case, even though I had the goodwin midpipe, I still needed BOTH of the O2 sensor extensions. No matter what I did, the first O2 sensor would not reach the header. So I ended up having to purchase both extensions, and just put both sensors in the midpipe.
Goodwin is amazing with response time for questions -- any issues, and they email you right back. Thats a lot more than I can say for our other Miata shops online.
This header sounds great. I put this on after breaking in my 2.5L engine and I couldn't be happier. Doing this task on my own for the first time, however, was a pain. I did have an issue with the connection to the midpipe. The connection flange was turned approx. 5 degrees clockwise making the midpipe and header not connect properly, and I had to spend a good hour or two just on tweaking and manipulating the midpipe to twist just enough for the connection to be made.
I currently have an ISR performance muffler delete with the stock midpipe and this header. The sound outside of the car is not as loud as you perceive it from inside the car as a side note. This is where I believe the Helmholtz midpipe will come into play, and will probably be my next buy.
My own personal installation note:
This header WILL NOT go in without either removing the alternator, or tilting it forward by removing the top bolt and the bottom, rear bolt. I opted for the latter option, but needed to maneuver the AC lines and the Coolant hose out of the way. Removal and installation time for myself on my own (First time ever doing this) was about 4-5 hours with about 2 hours being me tweaking the midpipe.
Overall great header, might have just been a one-off on my flange.
Did a 2.5 upgrade installed header along the way perfect fit well made header.
Want to Review This Product?
(You must be logged in as a Good-Win-Racing Member. Join Now. It's Free!)