

Progress Technologies FRONT and REAR AntiSway Bar Combo!
2016-2026
Our BEST All Purpose Sways, Street, Autocross, Track!
PART NUMBER: 61-1784
DESCRIPTION
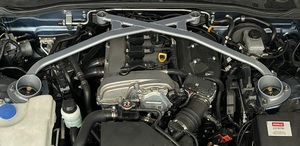
Our BEST MX5 Sways! These Front and Rear PROGRESS MX5 Miata and Fiat 124 sway bars were developed on our own 2016 Project MX5 with all our racers here driving the car at the limit at local SCCA events to perfect the balance and test the bars at the limit. A perfect match for our Progress Springs to make your MX5 corner flat and stable through the most challenging turns!
Grassroots MotorSports Magazine picked these same sways for their Project ND, and concluded: "Our MX5 exhibited much less body roll. It felt better from behind the wheel. It looked better too, as our sports car wasn't trying to corner on the door handles. It certainly felt better, but what did the stopwatch say? The new anti-roll bars shaved our average lap time by 1.34 seconds." December 2016 Issue.
Progress MX5 anti-roll bars dramatically improve handling. How? They minimize the traction-robbing body "lean" that rolls part of the outside tires off the pavement. Our Sport-tuned Anti-roll MX5 Miata Sway bars replace skinny OEM Miata Sway bars and rubber bushings with larger diameter (stiffer) alloy steel bars and polyurethane bushings.
More roll stiffness means less body "lean", and the tires stay flatter on the pavement (larger contact patches). The result is more grip and added driver control!
-Less body roll means more traction, faster cornering speeds, and increased driver confidence.
-Polyurethane bushings produce crisp response on turn-in. Progress Anti-roll bars are cold-formed in-house using custom-built precision bending equipment. Laser-cut and CNC bar ends are MIG welded in place using a precise fixture for an exact fit that is more durable than alternatives used by some other choices.
Features:
-Size: FRONT 28.5 mm (hollow bar; 6.35mm side-wall)
-Size: REAR 16 mm SOLID
-Adjustment Range: Front 3 holes, Rear 2 holes
-All sway bars are powdercoated metallic gray.
-One year limited warranty
INSTALL NOTES: Open BOTH ends of the box to find the hardware and instructions!
BRIAN'S APPLICATION NOTES. Our Endlinks recommended to properly reach all the front bar holes. With these bars the ND Miata is so much more flat and stable...and a blast to drive on freeway on-ramps and mountain roads! These bars are finished off MUCH nicer than most choices, in some ways that will not be obvious from the little photos. Perhaps the most obvious difference between these bars and any other brand is the triangle shaped extra brackets you see in the pictures. If you look at the factory rear sway mounts the purpose will be immediately clear, because you will see that not all four of the factory rear mount corners are actually connected/supported. It brings back memories of what Mazda did with the NA/NB front sway mounts, where failure of the factory mount became so common that we had to offer a complete replacement mount (and Racing Beat offered 'blocks and bolts' for that generation to reinforce the factory mount to avoid it breaking). Very similar here, because the factory rear ND sway mount is not actually connected all four corners we provide the brackets that fully box the mount. We found solid .75 bar at the rear performed SOFTER than .62 bar with fully boxing the mounts. First picture below is the factory mount not supported on one side, and then second picture showing our bracket in place that fills the gap to fully box the mounts for long term strength and reliability.
SETTNGS: I strongly caution and suggest a more forgiving starting position such as middle or tightest position front (tightest is closest to center of bar) and the less tight rear setting (hole nearest bar ends) until you have some experience with the setup under controlled circumstances (such as an autocross event or big parking lot).
Autocross Tested by the Entire Good-Win Racing Team!
Track Tested by the entire Good-Win Racing Team at Mazda Raceway Laguna Seca!
Video below shows our ND in first two sweepers of Autocross event at full throttle and you can see it is much more flat in the turns than stock thanks to Progress Sways and Progress Springs.
Ride along in our ND Miata for First Place finish with our Progress Sways and Ohlins coilovers.
CUSTOMERS WHO BOUGHT THIS ITEM ALSO BOUGHT


RoadsterSport ND SuperStreet Single Tip Muffler
MIATA MX5-ND 2016-2026
Stainless Steel PREMIUM ADJUSTABLE MX5 Miata Exhaust
Helmholtz Chamber Design Means Max Fun.
Just 14 pounds!
Gains 8hp in independent magazine tests!
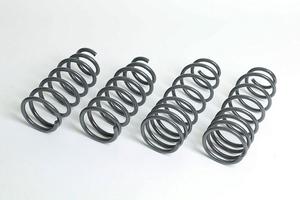
Progress Technology Springs for ND RF
MIATA MX5-ND 2016-2026 · RF
Good-Win Racing Exclusive....Get RF Heights Right!

McGard Spline Drive 16 Lug Nuts and Tool Set Black
MIATA MX5-ND 2016-2026

Ohlins Road and Track DFV - ND / Fiat124
MIATA MX5-ND 2016-2026
Choice of Champions at ALL Levels of MotorSports!
TEAM RECOMMENDATIONS
Customer Reviews
Progress Technologies FRONT and REAR AntiSway Bar Combo!
I had Progress Springs on my Audi so I trusted the brand and quality. Installation wise, I had it done professionally since I also had them install both the Progress Springs and Sway Bars and do alignment at the same time.
Although the drop (~3/4") was less than I wanted, my ND3's handling was day and night after the upgrade.
It didn't take long to be convinced to get these sway bars after reading reviews and watching videos. My ND3's handling was day and night afterwards.
Installation wise, I had it done professionally since I also had them install the Progress Springs and do alignment at the same time.
I purchased the Progress Technologies front and rear sway bar combo for my 2022 MX5 RF Club when I upgraded to RoadsterSport V2 sway bar end links and Ohlins coilovers. I am very pleased with the results because it addresses the ridiculous body roll when turning and compliments the coilovers. I highly recommend upgrade all MX5 owners to consider this upgrade from Progress Technologies to eliminate the body roll.
Very high quality! Wish it was a better color. Haven't had a chance to really test it out. ASAP I want to take it to Tail of the Dragon.
If you have stock suspension you need these!
I probably sound like a broken record but "THIS IS HOW THE CAR SHOULD HAVE COME FROM THE FACTORY!"
This is 100% the best bang for your buck on the ND Miata.
I'm on stock club suspension and I don't even feel the need to get coilovers or different suspension anymore. Maybe just lowering it a little ;)
------------------------------------------------------------------------------------------------------------------------------------------------------
Steering is so much more direct and there is way less "pitch" in the body motions. When going around a corner it's way less sketchy because you aren't waiting for the suspension/body to catch up and you can tell where the limit of grip is at wayyy sooner than in stock form. These swaybars have improved my confidence when driving at the limit.
Before the car was very "understeer'y" and when doing a u-turn I could never get the back to slide out with just throttle unless I kicked the clutch. Now with their recommended settings "front in the middle setting and rear on the softest setting", it behaves how I want it to. I can do a U-turn and the rear will slide out with just power. That's not to say the car is now tail-happy, it's just to say in my experience the car is now more predictable in the way I'd like to be driving it.
I'm very happy these came with reinforcements for the rear swaybar mount and it is a welcomed piece, I wish that GWR also made a front reinforcement kit for people like me on stock "soft" suspension and sticky tires.
------------------------------------------------------------------------------------------------------------------------------------------------------
*** This section is not related to the GWR swaybars or how they perform but is related topic-wise. ***
I also installed the Pacomotorsports Reinforcement kit along with this, and I'd like to say that they are structural and I'm confident the front subframe mounts won't rip off, but because it was produced in tandem with FM's billet bracket kit, you run into issues with the bolt/bracket/tab deforming and bending under very little torque when using the OEM bracket. The billet bracket is also thicker than the OEM stamp steel bracket and that is not accounted for in the final product, resulting in the bending of certain areas. Just keep that in mind if you decide to get Paco's reinforcements for the front subframe.
------------------------------------------------------------------------------------------------------------------------------------------------------
Installation does take some time, but I do believe anyone mechanically able can do it. There are plenty of resources and videos on how to replace the Front sway bar. The rear is self-explanatory and will take you 15 mins tops.
I was able to do the front and rear swaybar within 2 hours after watching videos on how to do the replacement.
Tips:
- I only jacked up the front of the car for both front and rear replacements. This will give you more space to work as the front is angled up instead of being level.
- You can do the rear swaybar on the ground without lifting the car at all.
- use soapy water or something slick so the OEM vulcanized swaybar bushings can move around more easily and not get stuck due to friction.
- when installing the new swaybars don't install the bushings on just yet until you get them in place.
- when installing the front sway bar, you need the "hump" to be facing up, or it will make contact with the EPS motor and radiator fans
- I installed the rear with the tabs facing just like the pictures in the instruction set.
- Since the new bushings are poly, and as we all know poly likes to squeak after a while even when greased. I put a thin layer of Teflon tape between the bushings and swaybars, this helps prevent squeaks (do your research) that doesn't mean you shouldn't be doing regular maintenance and re-greasing them after many many miles. Like most things, there is no such thing as maintenance-free.
I've come to really like GWR products. I can tell the time research is there, there are no marketing gimmicks that try and persuade you that "you need this product", just raw data and really good results! Make sure to do your due diligence and research research research!
Finally had these installed. Definitely makes quite a difference in handling! I already had coilovers installed and those reduced the body rolled quite a bit. This sway bar combo further tamed the body roll to the point that you may never feel it again. It made my ND2 feel safer to drive as well, especially during spirited driving.
Installed the Progress springs and waited about 6 weeks to install the sway bars. The front sway bar install was more difficult than the internet made it look. I ended up just cutting the old one out. In retrospect I should have just paid someone..
Either way, what an epic difference. The car feels like a Porsche! Not only is the cornering flat and locked in, the steering feels tighter. I daily this car and I'm glad I didn't go with a stiffer spring. I think anything stiffer/lower would make it tough around town. With this setup I feel so much more confident, and the car is fully transformed. Even the acceleration & braking are dramatically improved. First time I hit the canyons, I couldn't stop smiling!!
Anybody considering this combo should not hesitate. I could instantly tell these parts are optimized for serious performance. I can not imagine getting more performance for this amount of $$. Thanks Good-Win!
What can I say, they work, and now much less body roll! I won't say it eliminated it, but certainly a noticeable difference. I think with some coilovers, which are up next, the body roll and stability will be about where I want it. I went with the Progress bars mainly because they don't require extra bar locks like some others, they are bit more stiff then some of the others I researched in the same price range, and they have reinforcement brackets for the rear bar.
The installation was straight forward mostly, except for what has been mentioned many times here - the dreaded front OEM bar removal. I had access to a lift, so that made the job much more approachable. I really feel a lift is the way to go just for that front bar removal alone! It took about 4 hours for front and rear. I followed FM's YouTube video on how to do that without removing the steering rack to avoid possibly requiring an alignment afterwards.
Some install notes to help anyone DIYing it:
First, I would highly recommend FM's ND YouTube install video on it. Also, I found it easier to get the back bolt on the lower radiator hose mount if you don't mount the new bar first. Just get it nearly in place and that will give you plenty of room to get to that bolt with a box ratchet. Same goes for getting the OEM bar out, loosen the bracket first to move the bar a bit, and that bolt becomes easy to get to.
One more tip, when you go to put the mid and lower radiator brackets back after installation, don't snug anything down. Leave everything just barely threaded in so that you have wiggle room with the radiator to get it all aligned.
I added the sway bars to my 2020 MX5 which already had Ohlins coil-overs and 17x9 Konig's with Michelin PS4S 225/40x17.
The major change from before installing them is that I can run the coil-overs on a softer setting (9 clicks front and rear and recommended ride height) while maintaining a very good turn in and the car staying flat during the turn. Really good feeling, the car is now less snappy when cornering hard (thanks to coil-over being set softer) and super predictable. I love it. The car is now even more nimble at higher speed changing lane is instantaneous and the car stays totally flat.
Installation took me a good 5 hours (alone on jack stands). The most painful part is the front sway bar while the rear sway bar is super easy to install even without removing the muffler, keep it for the end. I followed the installation guides published on youtube to change the bars without going through alignment again.
I got this car for my wife and while she was enjoying it on the track, I took it for a few laps on a track day and I know it's not a fair comparison, next to my Camaro 1LE, but this MX5 in stock configuration was severely disappointing with how much body roll it had. My wife said it looked like it was on 2 wheels going around corners with me behind the wheel. Fast forward to yesterday and I've installed both of these Progress bars and all I can say is WOW!!! This is how the car should have come from the factory! There is barely even a hint of body roll now (we did also replace and add both front and rear upper strut braces but we're on the stock Bilsteins and springs)! This car now feels like a proper sports car and my wife is even more thrilled to drive her car than she already was. The suspension doesn't feel any harsher on bumps but the grip is so much higher especially when accelerating out of a corner and is very predictable. These sway bars are hands down the best mod you can do to this car other than tires.
Great bars! Words can not describe how much they improve body roll in turns. This is the solution to annoying body roll.
If you're reading this, you're disappointed with the MX5's excessive body roll. The Progress front and rear sway bar combo fixed the problem for me. The car feels more planted overall and much flatter in corners, with a minor amount of increased overall ride harshness. You'll also want to install the subframe reinforcements for the front bar if you're not stiffening the springs, and the lower profile front endlinks if you want to reach all of the possible mounting holes. I re-used the OEM endlinks on the front and rear but I ca't reach all of the holes on the front bar.
Install is no joke. I changed these out at home on jack stands. I'm a mechanically inclined guy and I did my homework and had all the necessary tools ready to go. It took me over seven hours from start to finish, working on my own. I'm skeptical of any home mechanic doing this for the first time who's reporting that they did this in under four hours. The front bar will really test your patience and you'll have to remove more bits and bobs than the instructions will tell you about. I wanted to keep the front bar in case a future owner wants it, but I considered just cutting it in half during several frustrating moments when trying to remove it. Be honest with yourself about your abilities and patience level, this may be a job better left to a professional.
I thoroughly enjoy my Miata but wanted it to corner better. I had already installed a Goodwin RoadsterSport SuperStreet Twin Tip exhaust,which is fabulous. Because I mostly drive the canyon and mountain roads near me (often covered in debris) I did not want to lower the car with performance coil springs. I installed the Progress Technologies sway bars and although the rear is easy, the front was a nightmare. In hindsight, I should have had them installed by someone competent. The car now runs and drives like it should have, from the factory. Thank You Brian.
One word review: WOW!
Bigger review: These antisway bars are no joke on corners and I may be imagining it but acceleration is notably better. The rear took me about 25 minutes to install and the front took about 2 hours but I was taking my time. I opted to drop the lower radiator mounts and only unplug the steering rack instead of dropping the entire rack. Took longer to remove all the splash guards and wonder where my 14mm socket went than the rest of the job as it went pretty smooth. I went with the recommended 'soft' rear adjustment and the 'middle neutral' adjustment and my car is as good as the Lotus Elise I use to drive professionally. At an impromptu meet on a closed course I got to get crazy and found that the car takes corners flat and literally feels like a slingshot pulled back on the apex of a corner as it launches out of the turn. I am currently waiting for my coil overs and if you are strapped for cash this was the BIGGEST bang-for-the buck I have EVER put on a car and I'm hard to impress! With traction control off the car is a drift missile to and will give you smiles for miles; bottom line money may not buy happiness but it will buy BIG FUN!
I was debating whether I was just going to do the front or both. I knew eventually I will be getting both front and rear, so I went ahead and ordered them.
The rear installation was a breeze, no inner fender plastic liners to remove, just unbolt and bolt on the new brackets and attach the sway bar to the endlings and done!
The front is a bit tricky, I use the method that one of the member reviewed and he also added a YouTube link above. It got the job done without any issue. It was just a lot parts you have to remove and make sure you put all the stuffs back to where they belong and the harness attached. You just need a few tools from Harbor Freight and save yourself from paying hundreds at a shop for this DIY job.
The end result was satisfying, the elimination of the ridiculous body roll will put a smile on your face.
This should be the first modification for the ND MX5.
The car handling are completely changed in the good way!
Cornering and ever in the high way, it gives you more confidence.
For installation, for the rear sway bar, make sure you have a 17 mm long wrench,
since you have to install a extra piece to the sub-frame and it makes a BIG difference.
For the front one, it is a pain to remove the old sway bar but it is totally worth the pain!!
Looking forward to the next mod.
Already installed Good-win racing exhaust and love it.
Thanks Good-Win. I wish you guys had a dealer in Canada, so I don't have to pay a big delivery fee.
ncw
These sway bars should have been factory equipment on the Club model. They practically eliminate body roll. If you want to get rid of the extreme body roll of these cars without lowering the car, this is what you want. The rear sway bar is super easy to install, the front is a total pain. The worst part is removing the factory front sway bar. I've installed both the Roadster Sport sway bars on someone else's 2016 MX-5 Sport, and now these Progress Technology sway bars on my own 2016 MX-5 Club. On the Roadster Sport kit we had to unbolt and shift the steering rack forward to install the new front bar. Progress will tell you to unbolt the steering rack and disconnect it from the steering shaft. I had the most success unbolting the lower coolant hose coupler and temperature sensor and pulling it below the subframe. With the Roadster Sport kit we had to cut off the factory bar's bushing on the passenger side to slip it through. I didn't have to do this to remove the factory bar when I disconnected and lowered the lower coolant hose coupler and temp sensor plug.
Overall, these sway bars are a great value for the money. The removal/installation on the front bar is the real kicker. You're best off removing the lower coolant hose coupler and sensor plug, and possibly the passenger side and middle radiator brackets, to get the space you need to push the old bar out and the new bar through.
Incredible results after front and rear bars. This upgrade converted Mazdas fun car into a true sports car. Flat through virtually any corner. Precise without feeling twitchy. Cant wait for the next track day.
Installation notes: Front install clearances are extremely tight. Skip the coffee and load up on patience. It can be done DIY on jack-stands. Good-Win tech support is fantastic if you have questions.
If you are upgrading your suspension then finish the process with these anti-sway bars. I did some research and these were the perfect marriage with the GWR springs upgrade. I had them professionally installed to ensure it was done right. (Not as simple as some would have you believe for every DIY guy) I went with GWR's recommended middle hole config up front as this setup is for spirited B road driving only. The rigidity these provide is immediately noticeable in the ride quality and steering response making the car feel dramatically more responsive overall. I would highly recommend this mod if your goal is to compliment any other suspension mods. A+
Peter - FL 11/2019
These bars make the car feel so much better! Mazda should have made these sway bars standard on all NDs.
Want to Review This Product?
(You must be logged in as a Good-Win-Racing Member. Join Now. It's Free!)