


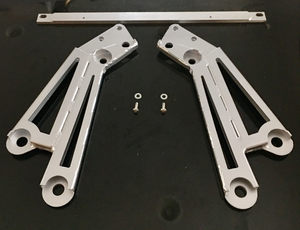
RoadsterSport MX5 ND Miata V2 Front Shock Tower 'X' Brace
2016-2026
PART NUMBER: 61-2789
READ REVIEWS (26) | WRITE A REVIEW
OUT OF STOCK
DESCRIPTION
One piece is MUCH stiffer than the multi-piece alternatives! Now updated to V2 with X design for even more strength. LIGHTEST Shock Tower Brace on the market for ND ... featuring an ultra stiff honeycomb aluminum construction. Just 4.3 pounds! Finished with a durable powder coat finish. The aluminum bar possesses high rigidity and resists flex while stiffening up your engine bay for better steering response and less front cowl shake. Most easy way to reduce NVH. This bar for the ND Miata also connects to the firewall.
Made in the USA, carries a lifetime warranty!
Strong AND lighter!
Many times stronger than the multi-piece factory steel brace and yet lighter too! Factory steel shock tower brace: 4.5 lbs
Other aftermarket steel shock tower braces solve the strength issue of the factory brace, but are far too heavy, the lightest of them starting around 8-9 lbs and they go up from there! RoadsterSport V2 honeycomb aluminum shock tower brace: 4.3 lbs
YES, fits with Edelbrock Supercharger. Does NOT fit Fiat 124.
If your ND Miata came with a factory steel shock tower brace this is a nice upgrade designed to include access for adjustment knobs when you add adjustable shocks or coilovers.
INSTALLATION NOTES: Re-uses some stock hardware and includes additional hardware needed for install. If your ND Miata did not come with factory shock tower brace note you need to add the Mazda Cowl Mounting Bracket for Shock Tower Brace, our item 60-1238ND. Install of 60-1238ND is a challenge for average DIY owner, typically a mechanic will install the 60-1238ND bracket. If your ND Miata already has a stock tower brace then the cowl bracket is factory installed and swapping out just the shock tower brace is very easy, just 30 ft/lbs please on the shock tower nuts, and 15 ft/lbs on the smaller firewall nuts. Use a torque wrench! They cost $20 or less at Harbor Freight, worth the investment if you don't have one.
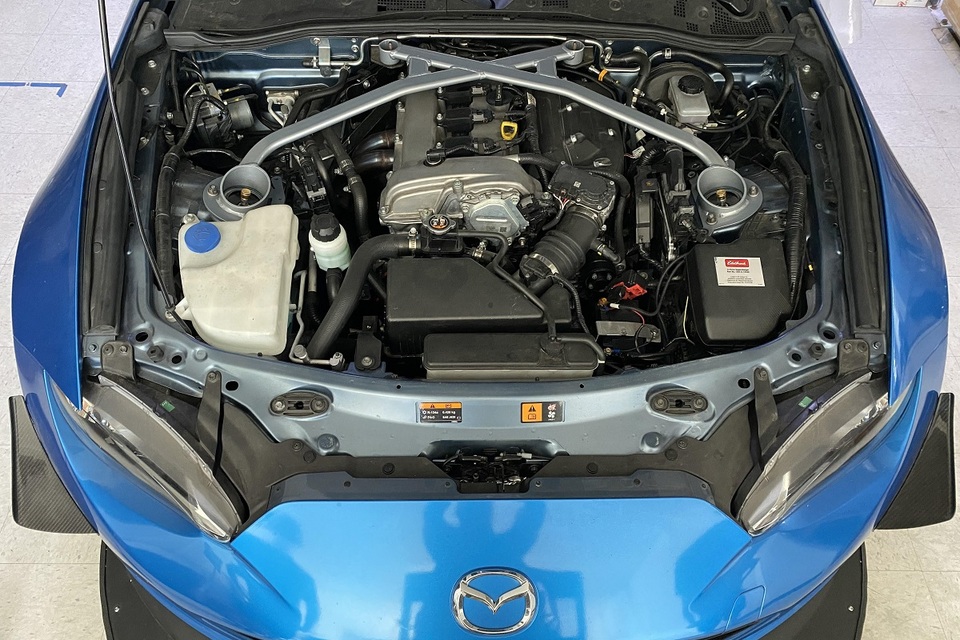
Note that due to small differences between cars, rear cowl bracket position, etc. the brace may not sit perfectly flat until it is bolted down fully. If you have factory BLACK painted steel brackets sitting on the shock towers with "R" and "L", those need to be removed BEFORE the new brace will sit flush as shown in the pictures here. To install, set the brace in position and then lightly install all bolts/nuts that hold the brace to the vehicle and then tighten them down evenly. The brace will snug down to the vehicle and the result will be extremely rigid and strong.
Sound tube note:
Many cars do not have a sound tube. For cars that have a sound tube, the sound tube passes around the brace and will rest against it. The brace was designed on a car without a sound tube, and since most folks delete the sound tube, this was not a major consideration. We sell a sound tube delete kit separately on our site that allows you to de-clutter and simplify your engine bay. But if you do want to retain your sound tube you can, the tube just sits there resting against the brace, no harm is done.
Customer Installation Photo with our OHLINS Coilovers and Takeda Intake:
Yes, fits with HKS supercharger and Edelbrock too.
YES, fits 2024 too as shown below with our JBR intake hose too:
CUSTOMERS WHO BOUGHT THIS ITEM ALSO BOUGHT


Progress Technologies FRONT and REAR AntiSway Bar Combo!
MIATA MX5-ND 2016-2026
Our BEST All Purpose Sways, Street, Autocross, Track!

Factory Mounting Bracket for Shock Tower Brace
MIATA MX5-ND 2016-2026

RoadsterSport ND SuperStreet Single Tip Muffler
MIATA MX5-ND 2016-2026
Stainless Steel PREMIUM ADJUSTABLE MX5 Miata Exhaust
Helmholtz Chamber Design Means Max Fun.
Just 14 pounds!
Gains 8hp in independent magazine tests!

Ohlins Road and Track DFV - ND / Fiat124
MIATA MX5-ND 2016-2026
Choice of Champions at ALL Levels of MotorSports!
TEAM RECOMMENDATIONS
Customer Reviews
RoadsterSport MX5 ND Miata V2 Front Shock Tower 'X' Brace
The X brace made the car feel more stable in corners and less NVH. It also looks much better than the factory 3-piece brace. I found the install pretty straight forward. I just put brace in place but not bolted down. Then you can lift each side to bolt the EVP unit and ECU unit to the brace easier. Once they are on the brace you can then bolt everything down to torque specs. There are some you tube videos to give you a little preview of the install. Very nice upgrade!
The brace is surprisingly light and rigid. Welding is top tier. Beautiful look in general. Comes with hardware to install.
I got this because I liked the look better than others and it's one-piece design. I watched a lot of videos to learn about the installation and challenges. Everything went smoother than expected at first until I got to the bolt that was by the battery. After dropping the bolt 2x and having to jack up the car to look for the bolt, I ended up removing the battery. Although that took at extra few minutes of labor, it was well worth it and saved me time in the end. I love the clean look and how it matches my Aero Gray ND3.
Took me a little bit longer than expected since I have the brake master cylinder brace/ bracket installed. Been driving my ND for 2 years and as far as suspension mods this is the one that has helped me the most for NVH and how smooth the car feels over bumps or road imperfections. The less NVH just creates a really stable car through out turns and it gives you a lot of confidence. I wish I would have done this mod earlier! I was using the stock tower brace and the difference is really noticeable. Most likely I would be buying the rear shock tower. Please get this upgrade, you will be happy!
The Bar is 3/4 pounds lighter then stock. Driving impression: I feel like the cars front end is more solid then before. Steering sensitivity has improved as well. Built quality is excellent, welds are very well made. The bar is extremely rigid. Less weight then stock, looks better and you get performance gains from this product.
worked well at a fair price, easy to install and opens up top shock towers for adjustment.
Extremely lightweight and well made product! Installing it was pretty easy, although it came with many nuts bolts and with no instructions. So it was a little confusing to know which bolts I should replace and which I should keep when installing this new tower. After the install, the difference in reduced body roll has been crazy and it looks awesome under the hood. I highly recommend purchasing, maybe just try and watch a YouTube video to see if there are some instructions on which nuts and bolts to keep from the original shock tower setup.
Like all other already said, the quality, finish and fit of this part is excellent, so why doing another review telling you the exact same thing?
In the end, my order really did not go as planned. The carrier delivered my item but it was damaged. I then contacted GWR and they were extremely responsive, I received a replacement in a more than reasonable time.
I would therefore like to emphasize here a point just as important as the quality of the items sold, namely the after-sales service of GWR which is excellent.
This order was my first at GWR and I can assure you it wont be the last!
Perfect fit ! Excellent build/weld quality.
As others have mentioned, the small screws/nuts are kind of a pain, especially for the ABS/Yaw sensor bracket. For the ABS/Yaw bracket (right side) I tapped 1/4-20 threads into the existing holes and attached bracket with hex socket cap style screws (better quality than button heads). Now if I need to remove the brace in the future, I just unscrew the 2 socket cap screws and don't have to worry with nuts on the backside.
I also painted my brace gloss black for more of an integrated OEM look.
Unlike my two previous NC Miatas, my 2018 Miata GT came from the factory with no shock tower brace. Even so, the 2018 (which was bought used with 22,000 miles on it), felt stiffer from the start. That said, there was still some cowl shake and "looseness" in the front end, especially over bumps and other road imperfections. Since installing this brace, there is a huge difference in the feel of the car. The steering is a bit sharper but more importantly, the car feels so much stiffer now and I can actually feel the stock shocks (for now) doing their job and absorbing the bumps and imperfections without the looseness I previously felt. Not only did this mod improve the feel of the car, but I would assume it will go along way toward preserving the tightness of the unibody tight over time. This is my first performance modification and I'm very pleased.
Installation was fairly easy. I had to install the firewall bracket first. I've reviewed that installation under that product listing. Installation of the brace was fairly easy in spite of there being no instructions included. The most difficult part was removing and reinstalling the two items mounted to the factory shock tower plates. I just kept everything loose until those parts were remounted on the new bracket. It took some finagling (how to say I'm 68 without saying I'm 68) but I got it all back together in a reasonable amount of time. That said, I thought some of the new plated hardware supplied had a cheap feel to it. I would also recommend that shorter hex head bolts be supplied for re-attaching the EVP control unit on the passenger side, instead of the long hex key button head screws that were supplied. Installing these might have been the most annoying part of the job as it requires holding the screw from underneath with a very small hex key and having a deep 10mm socket (who actually has one of those). I ended up using a 10mm wrench for very short turns of the nut while I held the screw. I will likely end up replacing those two screws with shorter stainless steel hex head bolts, making the job much easier in the future when I will need to remove the brace to change spark plugs.
That said, it was well worth the effort.
Pretty straightforward install if you have the factory mounting bracket for the shock tower brace. Just make sure not to drop a bolt or nut as it's quite hard to recover if you don't have the right tools.
Not sure if I feel any difference but I think it made the steering a little bit snappier.
Easy installation, and this is a very high quality yet lightweight brace. Makes the stock club brace seem silly in comparison! Gives me much better access to the adjustment dials in my Zeta CRD shocks. This paired with the coil overs and Progress Anti-Sway bar tightens up the front end very well and makes it drive/handle like a dream. I highly recommend you add this to your ND.
I replaced the factory brace with the Roadstersport X Brace and noticed an immediate improvement in steering response. This brace is stiffer than factory, and weighs about the same as the flimsy tubes. It really dresses up the engine bay. If there is a star rating system on Good-win's site, I'd dock a 1/2 point for not including installation instructions, and having to reuse a couple of nuts I had removed during the removal of the factory brace.
I bought this after getting the Sportster Suspension Kit for easier access to the adjusters for the front shocks. I think it is a must have if you get adjustable front shocks or coilovers.
Install is a little fidly but straightforward. There are no instructions but it is pretty easy to figure out what goes where.
Going slow and figuring things out, the install took me about 45 minutes.
I haven't tracked the car yet since installing (2 day HPDE coming up). On the street it does make the turn-in and handling feel more direct.
If your MX-5 came with the OEM strut tower brace installed or has another aftermarket brace, you might not see a significant improvement in handling; however, if you're like me and didn't have the factory or aftermarket brace installed. You'll notice the car is kept flat and has less front-end flex.
I had previously installed Ohlins coil-overs and an Eibach sway bar, which made for an excellent ride and flat in sweeping corners. Now that I've added the strut tower brace, the turn-in is immediate and flat. It has made the car a point-and-shoot weapon.
I can approach almost any corner at speed, with little to no braking, and the car sticks to the line.
This in conjunction with the goodwin subframe brace will transform front end feel of the car!
Does not feel like the same car after the two parts previously mentioned!
To me this piece specifically seems to improve how the car felt during directional changes, steering feel, directness of inputs, and on camber grip!!
Amazing
Would recommend
Brace and firewall bracket (2016 GTs didn't come with the required anchor posts) ordered at the same time. Took 4 days for the parts to arrive. Since I was going to remove the legacy firewall bracket, I thought I could install a generic oil catch can too, since access to the PVC and intake manifold nipples are much easier with the bracket removed.
Installation of the firewall bracket was pretty easy. Just followed the instructions here: https://youtu.be/uoXXQ34qE_0
The shock tower came well wrapped with assorted hardware for a virgin installation. The tower had good welds and paint. It fit without forcing or compressing, so no pre-loaded stress on the bar. Used these instructions form the forum. https://www.mazdatalkforum.com/viewtopic.php?f=9&t=3812&p=24587&hilit=Strut+tower#p24587
Even though the bar didn't come with pre-installed studs for the control units, I was able to attach bolts to the control units with the included hardware. Then the control units can be attached with just nuts(no need for a third hand).
Piece of cake install.
This is a very nice brace, great workmanship and finish. I had to install the firewall bracket so it was a little bit more involved than just putting on the brace. The firewall bracket was fairly easy to put on, just take your time and it will go great. I did use the instructions on the Moss Miata web site and that helped a lot, they did a great job showing pictures and easy to follow instructions. I do recommend checking the instructions out if you have to install the firewall bracket.
Now getting to the V2 brace, like I said it is a really nice product and it looks great on my Miata. Once I removed the stock strut tower brackets, the V2 dropped right into place. Just be careful when tightening the bolts and you're all set. No issues at all.
I haven't taken my car out for a drive yet so I can't comment on what a difference it makes, but it sure looks great. From what I read it should make a quite a difference, looking forward to finding out.
Very nice product, fit and finish are top quality. But Really! Add the studs for the "control units" on both sides! This product is 4 studs away from being the best it can be! 90% of the install revolves around the lack of these studs.
I had no idea how much of a difference this brace would make but I wish I had it sooner! I have a sport trim that it never came with the factory braces, and I found install including the additional firewall plate incredibly easy. Once installed a rattle that has been plaguing me in the dash went away so I was happy with just that until I took it to some canyons. The steering is more direct, and flex was gone truly allowing the suspension to take over. I have the dual duty Feal coil overs as well as Progress anti-sway bars on my MX5 and am eagerly awaiting my matching rear brace and eventual purchase of the under-body bracing as I was so impressed with how much more FUN my already fun car is with this simple part! It is also nicely powder coated and beautifully TIG welded with good hardware included so when you pop the hood people know you are all business on the twisty roads!
Want to Review This Product?
(You must be logged in as a Good-Win-Racing Member. Join Now. It's Free!)